How to Add Transitions In CapCut?
Are you looking to enhance your video content and make it more engaging and visually appealing? Now, CapCut offers an easy way to add transitions to your videos. With a wide range of transition options at your disposal, you can blend your video clips, creating a smoother and more professional look.
Whether you want to add transitions to a single clip or multiple clips in your project, CapCut’s intuitive interface and features make it a user-friendly choice for video editing. So, why settle for static video content when you can add different transitions to captivate your audience and elevate your videos to the next level with CapCut? Give it a try and see the difference it can make in your video creations.
How to Add Capcut Transitions
Here are the steps for adding transitions in the CapCut app
- Start by launching the CapCut app on your mobile device.
- Click on the “New project” widget to create a new video project.
- Select the video clips you want to apply transitions to and add them to your project.
- Your selected clips will appear on the timeline within the app.
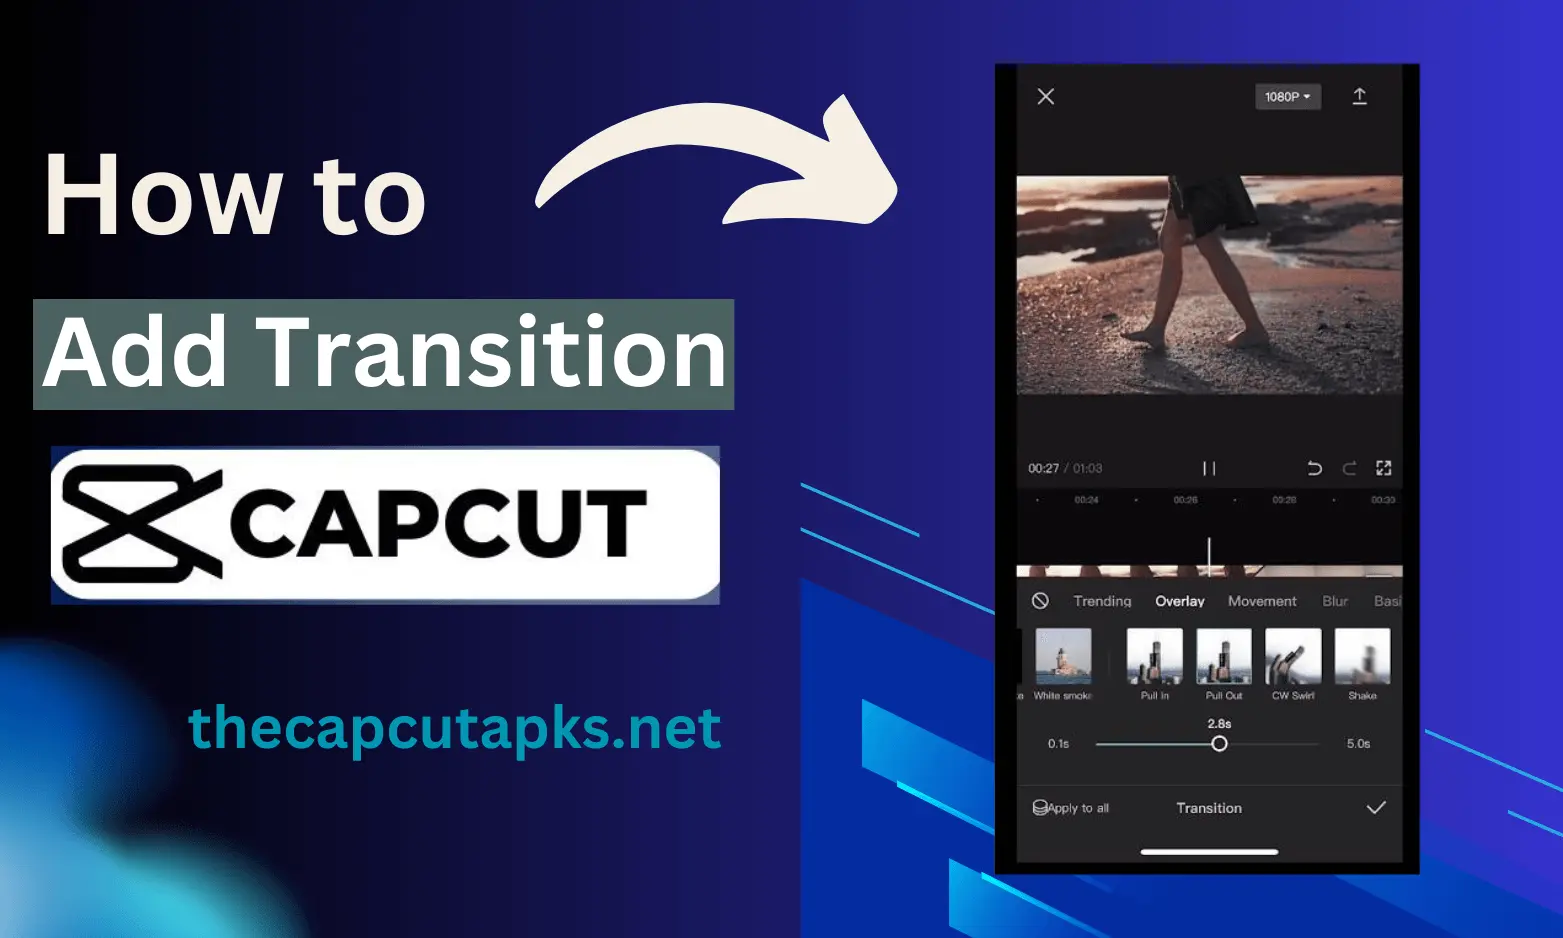
- Locate the white icon characterized by a small vertical line positioned at the intersection of the video clips, and proceed to click on it.
- From the array of available transition options, select your desired transition. You also have the flexibility to modify the transition duration by dragging the white circle along the duration line.
- If you wish to apply the chosen transition to all the clips in your timeline, simply tap the “Apply to all” option.
- To confirm and implement the transitions you’ve made, click on the checkmark icon situated at the bottom left corner of your screen.
- Once you have completed your editing process, navigate to the arrow icon in the top right corner of the screen to export your video to the local storage on your device.
After the export process is finished, you can effortlessly share your video on various social media platforms directly from the application by utilizing the icons located at the bottom of your screen.
How to Add a Transition to a Single Clip Using CapCut?
To add a transition to a single video clip using CapCut, follow these steps:
- Begin by opening the CapCut app on your mobile device.
- To start a new video project, tap “New project” on the home screen.
- Select the specific video clip from your album to which you’d like to add a transition, and then click on “Next.”
- To precisely place the transition in the video, drag the white vertical line there.
- Press the “Edit” option.
- Tap on “Split.”
- Your video will now be split into two segments, and between them, you will see the transition icon. Select the icon and choose the desired transition you wish to add.
- Preview the video to ensure the transition looks as you want it to.
- To add the transition to the video, tap the checkmark icon beneath the screen if you are happy with the outcome.
How to Edit a Transition in CapCut?
To edit a transition in CapCut, follow these steps:

- Open the video for which you want to edit the transition in CapCut.
- Tap on the transition icon within the video. The icon will now display two intersecting lines instead of a straight line.
- Choose a different transition to replace the current one on the video.
- Adjust the duration of the transition to your liking.
- Tap the checkmark icon to apply the updated transition to your video clip.
- Your edited video will now feature the new transition.
How to Automatically Add Transitions to Your Videos on CapCut
To automatically add transitions to your videos using CapCut’s ShortCut feature, follow these steps:
- Launch the CapCut app and access the home screen.
- Tap on the “ShortCut” widget to use this automated feature.
- Select the video to which you want to add transitions and click on “Next.”
- Allow ShortCut some time to analyze and generate a suitable template for your video.
- At the bottom, choose one of the available templates to preview your video.
- If you wish to retain the original sound of the video clip, select “Default sound” and then “CLIPS.”
- At the bottom of the screen, tap on the video preview labeled “Edit” and click on the volume icon.
- Increase the volume to the maximum to ensure your video plays with its original sound.
- At the top of the screen, tap “Export.”
- Click on the option that reads “Export without watermark.”
It’s worth noting that the ShortCut feature is not limited to videos; you can also use it with photos or even a combination of both. Keep in mind that while the ShortCut feature is quite useful, it may occasionally be slow to load templates.
FAQs
Can I use CapCut to add transitions to a single video clip?
Yes, you can use CapCut to add transitions to a single video clip by following the provided instructions. It’s a versatile tool for both single clips and multiple clips in your project.
Are there various transition options in CapCut?
Yes, CapCut offers a range of transition options to choose from, allowing you to add the right visual effect to your videos.
Can I use ShortCut with photos or videos?
Yes, you can use the ShortCut feature with photos, videos, or a combination of both, giving you flexibility in your creative projects.
Conclusion
CapCut is a versatile and user-friendly video editing app that enables you to enhance your video content with seamless transitions. Whether you’re a content creator, vlogger, or simply someone who enjoys making videos, CapCut offers a simple yet powerful way to add transitions to your video projects.
With the option to use the ShortCut feature for automated transitions and templates, you can save time and create engaging video content effortlessly. So, dive into the world of video editing with CapCut, and take your videos to the next level by adding captivating transitions that will keep your audience hooked.